REST API Development with Flask
Patterns for deploying RESTful Flask applications
Flask is a lightweight Python web development framework that is becoming more and more popular, as you can see from this comparison against Django.
In contrast to Django, Flask follows a minimal approach. Therefore, you should particularly choose Flask over Django if you want to be flexible about the libraries you utilize or want to build a lightweight application.
While Flask is surprisingly easy to work with, it takes some time to learn about best practices, such as how to structure your code, how to document your API, and how to test the functionality. In this post, I want to show you what I find to be helpful patterns for the development of RESTful Flask applications.
How to Structure a RESTful Flask Application
The file structure for a minimal Flask application that offers only a REST API should look something like this:
flask_app/
│   requirements.txt
│   app.ini
│   wsgi.py
│
└───src/
│   │   app.py
│   │   api_spec.py
│   │
│   │───blueprints/
│       │   blueprint_x.py
│       │   blueprint_y.py
│       │   swagger.py
│
└───test/
    │   conftest.py
    │   test_endpoints.py
What are these files all about?
- requirements.txt: Tracks the dependencies of your application such that they can be installed via
python -m pip install -r requirements.txt. - app.ini: This ini-file configures your application. Most importantly, it configures how your application should be served through the uwsgi application server.
- wsgi.py: WSGI stands for web service gateway interface. This is the entry point to your application, which must be configured via
app.ini. - app.py: This is the main file of your application. Here, all other modules are loaded and the application is defined.
- blueprints: Blueprints are a way to structure a collection of API endpoints. For example,
blueprint_x.pymay contain all API functions associated with functionalityx. The fileswagger.pyoffers access to a Swagger user interface, which is used to document the functionality of the API. - test: Contains tests for the API, which are written with pytest.
conftest.pycontains global fixtures that are automatically evaluated before running any of the tests defined intest_endpoints.py.
Setting Up a Minimal Application
To setup a minimal Flask application, we begin with the app.py file:
"""Flask Application"""

# load libaries
from flask import Flask, jsonify
import sys

# load modules
from src.endpoints.blueprint_x import blueprint_x
from src.endpoints.blueprint_y import blueprint_y

# init Flask app
app = Flask(__name__)

# register blueprints. ensure that all paths are versioned!
app.register_blueprint(blueprint_x, url_prefix="/api/v1/path_for_blueprint_x")
app.register_blueprint(blueprint_y, url_prefix="/api/v1/path_for_blueprint_y")
Through the use of blueprints, all view functions (all functions with a route decorator) are made accessible through the url_prefix, which
we will see later.
Next, let’s define the blueprints. Here, I merely show blueprint_x.py:
from flask import Blueprint, jsonify, request

# define the blueprint
blueprint_x = Blueprint(name="blueprint_x", import_name=__name__)

# note: global variables can be accessed from view functions
x = 5

# add view function to the blueprint
@blueprint_x.route('/test', methods=['GET'])
def test():
    output = {"msg": "I'm the test endpoint from blueprint_x."}
    return jsonify(output)

# add view function to the blueprint
@blueprint_x.route('/plus', methods=['POST'])
def plus_x():
    # retrieve body data from input JSON
    data = request.get_json()
    in_val = data['number']
    # compute result and output as JSON
    result = in_val + x
    output = {"msg": f"Your result is: '{result}'"}
    return jsonify(output)
Now that we have the blueprints, we still need a way to start the Flask application.
This is achieved by defining the wsgi.py file in the following way:
"""Web Server Gateway Interface"""

##################
# FOR PRODUCTION
####################
from src.app import app

if __name__ == "__main__":
    ####################
    # FOR DEVELOPMENT
    ####################
    app.run(host='0.0.0.0', debug=True)
Here, the important part is that the app is only run in debug mode when the script is called via python wsgi.py. Running the app
in debug mode is a huge deal during development because this ensures that the app will be reloaded every time a change is made to the source code.
Moreover, error reports are directly outputted to the console.
For production, wsgi.py only offers the app without explicitly running it because this is something the application server
will take care of.
Running the Application for the First Time
After installing flask via pip install flask, we can run the application for the first time. The recommended way is to use the flask CLI:
FLASK_ENV=development flask run
Alternatively, it is also possible to execute python wsgi.py.
Once the application has started, you will see the output Serving Flask app "src.app" (lazy loading).
To test the functionality of the API, we open a new terminal and make use of
cURL. The most important curl parameters for API testing are:
- -X <HTTP_VERB>: Defines the HTTP verb to be used for the query. There are five possible options:
GET,POST,PUT,DELETE, andPATCH. - -H <HEADER_DATA>: Defines the request header (e.g. specifying the content type or authentication information).
- -d <BODY_DATA>: A string containing JSON-formatted data, which may, for example, be necessary for
POSTqueries.
We execute curl on every API endpoint to ensure that the endpoint works:
curl localhost:5000/api/v1/path_for_blueprint_x/test

{
  "msg": "I'm the test endpoint from blueprint_x."
}

curl localhost:5000/api/v1/path_for_blueprint_y/test

{
  "msg": "I'm the test endpoint from blueprint_y."
}

curl -X POST -d "{\"number\": 5}" localhost:5000/api/v1/path_for_blueprint_x/plus \
     -H "Content-Type: application/json"

{
  "msg": "Your result is: '10'"
}

curl -X POST -d "{\"number\": 1000}" localhost:5000/api/v1/path_for_blueprint_y/minus \
     -H "Content-Type: application/json"

{
  "msg": "Your result is: '0'"
}
The output indicates that everything worked as expected. Note that, for thorough API development, one would use a tool such as Postman or Insomnia to manage these queries.
Getting Ready for Production
To get our application ready for production, we still need to do a few things. The first thing that we should change is the fact that our endpoints are still untested. Well, OK, they are not really untested. However, we didn’t create any automatable tests. Let’s fix that now.
Testing Endpoints with pytest
To automate our tests, we will use pytest together with the requests package:
pip install pytest requests
First, we use conftest.py to define some fixtures that should be available for all test functions:
import pytest
import os

def pytest_addoption(parser):
    # ability to test API on different hosts
    parser.addoption("--host", action="store", default="http://localhost:5000")

@pytest.fixture(scope="session")
def host(request):
    return request.config.getoption("--host")

@pytest.fixture(scope="session")
def api_v1_host(host):
    return os.path.join(host, "api", "v1")
Note that, by using the special function pytest_addoption, we can pass --host to pytest in order to specify
the hostname to use for the tests. This will come in handy later, when we are using a different port for the production environment.
Next, in test_endpoints.py, we define the tests themselves:
import os
import requests

def test_blueprint_x_test(api_v1_host):
    endpoint = os.path.join(api_v1_host, 'path_for_blueprint_x', 'test')
    response = requests.get(endpoint)
    assert response.status_code == 200
    json = response.json()
    assert 'msg' in json
    assert json['msg'] == "I'm the test endpoint from blueprint_x."

def test_blueprint_y_test(api_v1_host):
    endpoint = os.path.join(api_v1_host, 'path_for_blueprint_y', 'test')
    response = requests.get(endpoint)
    assert response.status_code == 200
    json = response.json()
    assert 'msg' in json
    assert json['msg'] == "I'm the test endpoint from blueprint_y."

def test_blueprint_x_plus(api_v1_host):
    endpoint = os.path.join(api_v1_host, 'path_for_blueprint_x', 'plus')
    payload = {'number': 5}
    response = requests.post(endpoint, json=payload)
    assert response.status_code == 200
    json = response.json()
    assert 'msg' in json
    assert json['msg'] == "Your result is: '10'"

def test_blueprint_x_minus(api_v1_host):
    endpoint = os.path.join(api_v1_host, 'path_for_blueprint_y', 'minus')
    payload = {'number': 1000}
    response = requests.post(endpoint, json=payload)
    assert response.status_code == 200
    json = response.json()
    assert 'msg' in json
    assert json['msg'] == "Your result is: '0'"
Note that the arguments passed to the functions result from the implicit calls of the session-scoped fixtures we defined in conftest.py.
To run the test suite, we simply execute pytest from our project folder, which will output the following results:
test/test_endpoints.py ....

============= 4 passed in 0.14s ==============
With all of the tests working, we can begin preparing the application server.
Setting Up the Application Server
Until now, we only executed the application using the development settings. However, for production, we should use a full-fledged application server.
Therefore, in the next steps, we configure uwsgi as the application server via app.ini:
[uwsgi]
module = wsgi:app
master = true
processes = 5
http-socket = 127.0.0.1:8600
socket = /tmp/app_socket.sock
chmod-socket = 660
vacuum = true
die-on-term = true
To learn about the meaning of the individual config options, consider the uwsgi documentation.
Most importantly, the config specifies five processes and determines that the server will run on 127.0.0.1:8600.
After installing uwsgi via pip install uwsgi, we can evaluate our setup:
uwsgi --ini app.ini --need-app
The following output proves that our application is available through five worker processes:
spawned uWSGI master process (pid: 33764)
spawned uWSGI worker 1 (pid: 33766, cores: 1)
spawned uWSGI worker 2 (pid: 33767, cores: 1)
spawned uWSGI worker 3 (pid: 33768, cores: 1)
spawned uWSGI worker 4 (pid: 33769, cores: 1)
spawned uWSGI worker 5 (pid: 33770, cores: 1)
How can we test that our endpoints are also accessible via uwsgi? I promised that the --host parameter for the tests would still come in handy and now is the time.
We simply execute the tests on the production host, localhost:8600:
pytest --host=http://localhost:8600
Again, we pass all of the tests:
test/test_endpoints.py ....            [100%]

============= 4 passed in 0.14s ==============
Further Steps
Besides uwsgi, one might want to set up a reverse proxy. Please take a look at this very helpful article about the use of nginx together with Flask.
Improving Usability through Swagger
An API can only become successful, if people know how to use. To make our API usable, we must document it and allow users to experiment with it. For this purpose, Swagger is the ultimate tool.
There are two steps to integrating Swagger with Flask:
- Generating a JSON specification file: Create a JSON file containing the documentation of your API that fulfills the OpenAPI specification.
- Deploy a Swagger UI: Deploy a Swagger user interface for exploring the API. The user interface is constructed according to the JSON specification.
I will first explain how to generate the JSON file and then deal with the UI.
1. Creating an OpenAPI JSON File
To create the JSON file providing the OpenAPI specification for our API, we will perform the following steps.
a) Create an ApiSpec Object
To define the specification, we will use the apispec package together with apispec_webframeworks and marshmallow:
pip install apispec apispec_webframeworks marshmallow
Using these packages, we can create api_spec.py, which defines an OpenAPI specification:
"""OpenAPI v3 Specification"""

# apispec via OpenAPI
from apispec import APISpec
from apispec.ext.marshmallow import MarshmallowPlugin
from apispec_webframeworks.flask import FlaskPlugin
from marshmallow import Schema, fields

# Create an APISpec
spec = APISpec(
    title="My App",
    version="1.0.0",
    openapi_version="3.0.2",
    plugins=[FlaskPlugin(), MarshmallowPlugin()],
)

# Define schemas
class InputSchema(Schema):
    number = fields.Int(description="An integer.", required=True)

class OutputSchema(Schema):
    msg = fields.String(description="A message.", required=True)

# register schemas with spec
spec.components.schema("Input", schema=InputSchema)
spec.components.schema("Output", schema=OutputSchema)

# add swagger tags that are used for endpoint annotation
tags = [
            {'name': 'test functions',
             'description': 'For testing the API.'
            },
            {'name': 'calculation functions',
             'description': 'Functions for calculating.'
            },
       ]

for tag in tags:
    print(f"Adding tag: {tag['name']}")
    spec.tag(tag)
Note how the schema classes capture our data model. We will make use of the schemas later, when documenting the API endpoints. The tags are just a nice way of structuring individual endpoints of your API.
b) Create an Endpoint for the JSON
Next, we need to make the JSON specification file available through our API.
We can do so by appending the following code to our app.py:
from src.api_spec import spec

with app.test_request_context():
    # register all swagger documented functions here
    for fn_name in app.view_functions:
        if fn_name == 'static':
            continue
        print(f"Loading swagger docs for function: {fn_name}")
        view_fn = app.view_functions[fn_name]
        spec.path(view=view_fn)

@app.route("/api/swagger.json")
def create_swagger_spec():
    return jsonify(spec.to_dict())
The code adds all the view function documentations into the ApiSpec object, which is then
made available through the /api/swagger.json endpoint.
We can verify the content of the swagger endpoint using the following command:
curl localhost:5000/api/swagger.json
c) Document the Endpoints
The endpoints are documented using yml-docstrings that satisfy the OpenAPI specification.
Here is an example for the endpoints defined in blueprint_x.py:
@blueprint_x.route('/test', methods=['GET'])
def test():
    """
    ---
    get:
      description: test endpoint
      responses:
        '200':
          description: call successful
          content:
            application/json:
              schema: OutputSchema
      tags:
          - testing
    """
    output = {"msg": "I'm the test endpoint from blueprint_x."}
    return jsonify(output)


@blueprint_x.route('/plus', methods=['POST'])
def plus_x():
    """
    ---
    post:
      description: increments the input by x
      requestBody:
        required: true
        content:
            application/json:
                schema: InputSchema
      responses:
        '200':
          description: call successful
          content:
            application/json:
              schema: OutputSchema
      tags:
          - calculation
    """
    # retrieve body data from input JSON
    data = request.get_json()
    in_val = data['number']
    # compute result and return as JSON
    result = in_val + x
    output = {"msg": f"Your result is: '{result}'"}
    return jsonify(output)
d) Validate the Correctness of the JSON
To validate the correctness of the JSON, we’ll write another test and include it in test_endpoints.py. After installing the validator package
using pip install openapi_spec_validator, we can implement the test as follows:
from openapi_spec_validator import validate_spec_url

def test_swagger_specification(host):
    endpoint = os.path.join(host, 'api', 'swagger.json')
    validate_spec_url(endpoint)
We run pytest once again to verify that the JSON we produce matches the specification.
In case of errors, it is helpful to make use of the the Swagger editor for debugging purposes.
2. Deploy a Swagger User Interface
The JSON file is not very useful if it is not rendered in a human-readable manner. This is why we will deploy a UI for swagger in this section.
a) Define the Swagger UI Blueprint
After running pip install flask_swagger_ui, we define the swagger UI blueprint in swagger.py:
"""Definition of the Swagger UI Blueprint."""

from flask_swagger_ui import get_swaggerui_blueprint

SWAGGER_URL = '/api/docs'
API_URL = "/api/swagger.json"

# Call factory function to create our blueprint
swagger_ui_blueprint = get_swaggerui_blueprint(
    SWAGGER_URL,
    API_URL,
    config={
        'app_name': "My App"
    }
)
With this configuration, the UI will be made available through the /api/docs endpoint.
b) Register the Blueprint
Now that we have a blueprint for the Swagger UI, we still need to register it with our application in app.py:
from src.endpoints.swagger import swagger_ui_blueprint, SWAGGER_URL
app.register_blueprint(swagger_ui_blueprint, url_prefix=SWAGGER_URL)
c) Test the UI
To test whether the UI displays all the expected content, let’s open the UI by navigating to localhost:5000/api/docs in a browser.
The result should look like this:
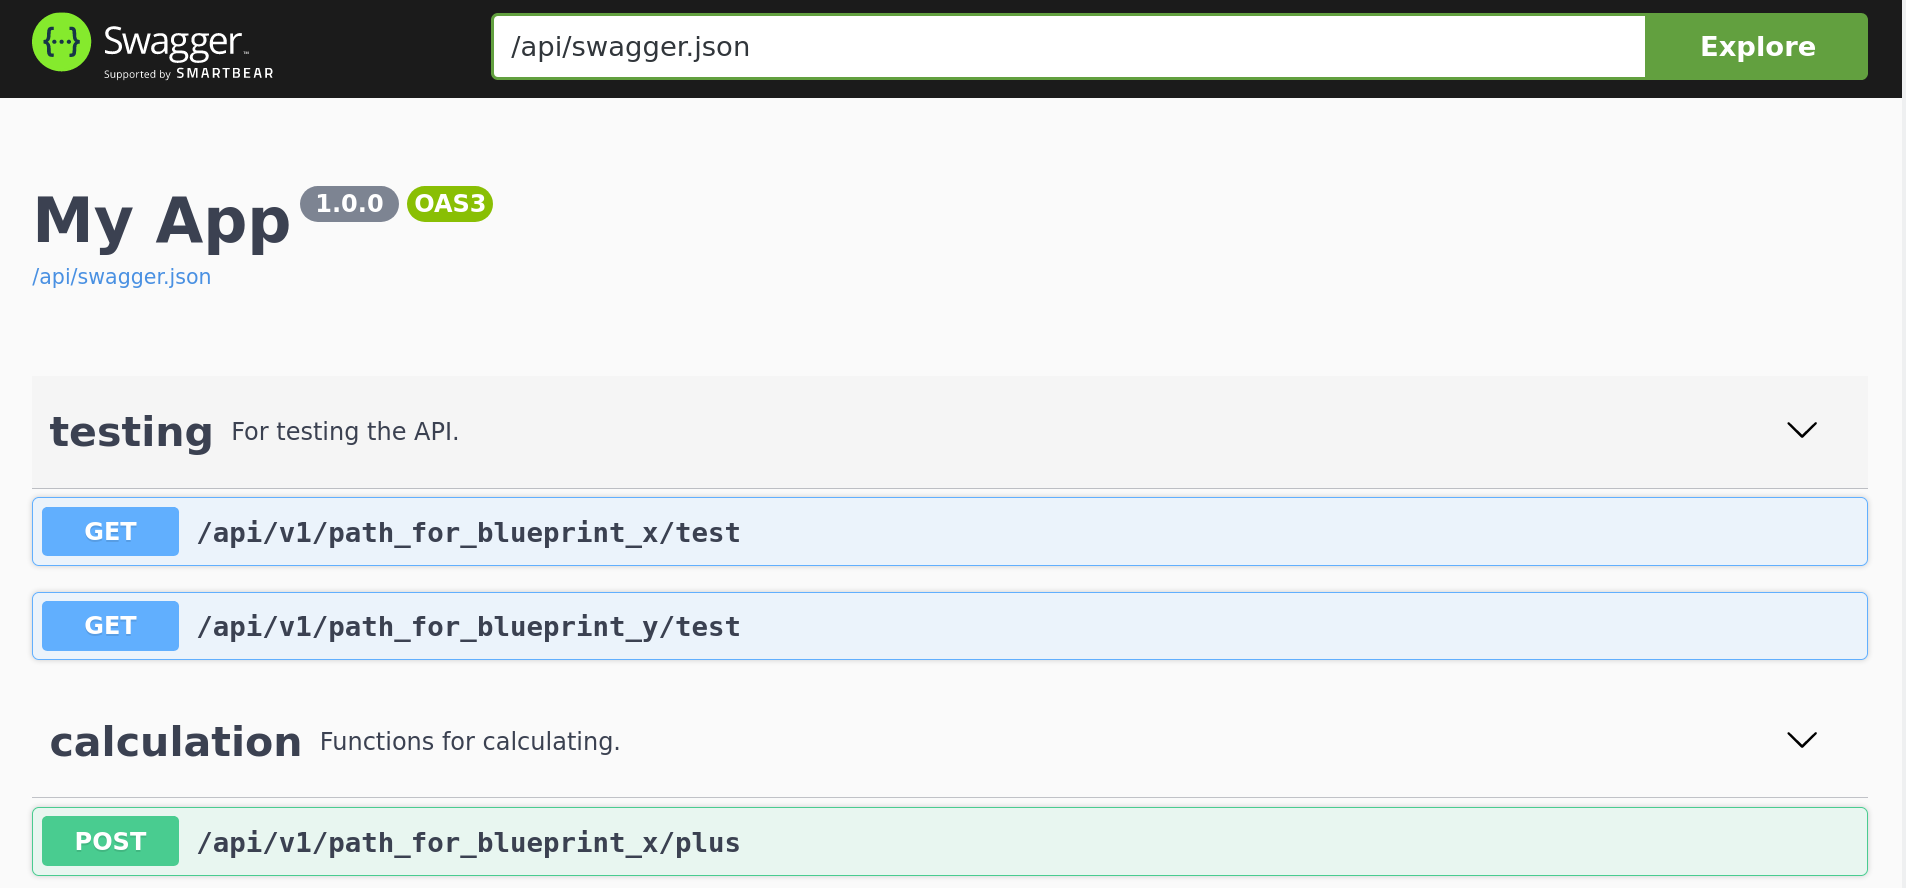
Summary
Flask is a lightweight, yet powerful tool for creating web applications. In this post, I showed you how Flask can be used to quickly build a small RESTful API. All of the presented code (and some more) is available at GitHub, in the minimal-flask-example repository. If you want to quickly get a Flask application up & running, feel free to clone the repository!
In the meantime, be sure to consider the following tips when creating your next Flask API:
- Use blueprints to structure API endpoints
- Document all requirements using a
requirements.txtfile - Test your endpoints are working using
pytest - For deploying your application, carefully define your
app.inifor use withuwsgi - Make your API understandable using Swagger documentation
And with that, I wish you a RESTful API coding.


Comments
tamara
13 Oct 20 16:44 UTC